Microalgae Cultivation Guide
- Jess

- Jul 21, 2024
- 6 min read
Updated: Jul 22, 2024
Hey there! Welcome to the first (and quite possibly the only) post from Microalgae With Beginners. We're a passionate group of students diving into our final year project centered on cultivating microalgae. Our aim? To share this beginner's guide with you, whether you're looking to grow microalgae for a project or to nourish your shrimp (yes, we fed our home-grown microalgae to our shrimps).
Conditions for Cultivating Microalgae
In this section, we will delve into how you can obtain the materials and create the optimal conditions for microalgae cultivation, detailing our own successful approach.
Cultivation of microalgae can be done in the home setting with the appropriate conditions. When cultivating microalgae, conditions such as type of water, pH, temperature, nutrients, aeration and lighting needs to be taken into consideration Additionally, to start cultivating microalgae there is a need for a starter culture.
Microalgae Concentrate/ Starter Culture
We strongly recommend purchasing microalgae or starter cultures locally and meeting face-to-face with the seller for several reasons. Firstly, meeting in person allows you to inspect the quality of the microalgae, ensuring that you receive viable starter cultures, Secondly, you can discuss your specific needs directly with the seller and receive advice on your microalgae cultivation.
In our cultivation, we purchased the green water starter from Blub Aquatics (on Shopee) and received lots of advice from him as well. If our group continues to cultivate microalgae beyond this project, you can purchase from our group if you are based in Singapore.
Type of water
Microalgae require dechlorinated water for cultivation because chlorine can be harmful and prevent their growth. Here, we'll discuss various methods to obtain dechlorinated water:
1. Buy dechlorinated water
Dechlorinated water can be obtained from buying drinking water in your local supermarket. For example, Ice Mountain does not contain chlorine, which is suitable for microalgae cultivation.
2. Obtain DI water
DI water is available in the laboratory settings, such as from school labs school.
3. Dechlorinating tap water conditioner
Tap water can be treated with a dechlorinator available at aquarium shops, such as API tap water conditioner. These products neutralize chlorine and make tap water safe for microalgae.
4. Boiling tap water
You can remove chlorine from tap water by boiling tap water for 3-5 minutes. After boiling, let cool before using it for microalgae cultivation.
During our cultivation period, we obtained and used DI water from the school laboratories as it is the most accessible for us.
pH
Chlorella Spirulina can thrive well in harsh pH conditions such as 10.5. It is necessary to test the pH of any water used and ensure it does not exceed 10.5.
The DI water sourced from our lab typically has a pH of 8.0 - 8.5., making it suitable for microalgae cultivation.
Temperature
In Singapore, during the day, the typical room temperature is 31 - 33ºC. Chlorella Spirulina thrives within temperatures of 25 - 32ºC. It is recommended to use an aquarium thermometer to monitor the temperature accurately. To regulate temperatures, especially in warmer conditions, using an aquarium fan or any standard fan is advisable. A fan can lower the temperature by 1 - 2 ºC. An aquarium fan is highly recommended due to its compact size and the ability to easily attach it tangentially to the cultivation shops. Aquarium fans are available at local aquarium shops for purchase.
Nutrients
Microalgae grows well in water bodies with high nitrogen, phosphorus and potassium. Insufficient nutrients will inhibit microalgae growth. It is necessary to use inorganic/ chemical NPK fertiliser as it does contain other traces of nutrients. Inorganic/ chemical fertilizer can come in the form of pellets or crystal. You can find these inorganic/ chemical fertilizer from the gardening section of your local supermarkets or gardening stores.


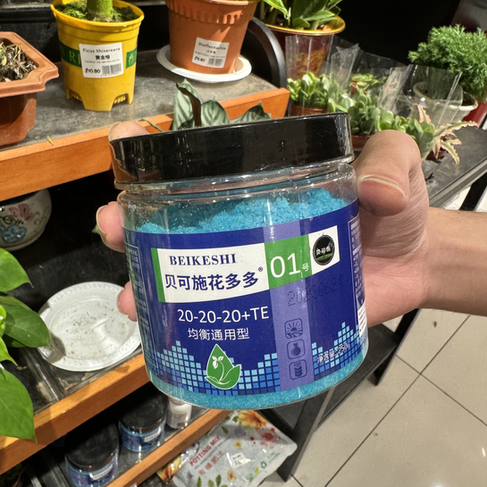
In the left, the pellet form. In the right, the crystal form. The pellets can cause your microalgae suspension to look a bit cloudy. Hence, it is advisable for you to use the crystal form.
DO NOT ADD TOO MUCH INORGANIC/ CHEMICAL FERTILIZER, YOU WILL PROBABLY BURN OFF AND KILL YOUR MICROALGAE. (This applies to other plants)
In our cultivation method, Yara Mila NPK 16-16-16 is used.
Aeration
Strong aeration is necessary to cultivate microalgae, promoting even mixing and preventing clumping up of microalgae at the bottom of the plastic bottle. Additionally, aeration facilitates gas exchange, preventing oxygen accumulation during the day and carbon dioxide build-up at night. Excessive levels of these gasses can inhibit microalgae growth and cause fluctuations in water pH. For effective aeration, an aquarium air pump is recommended. Avoid using air stones as they do not support uniform mixing well due to the small air bubbles they produce. Instead, larger bubbles are preferred for more effective mixing.
Lighting
Sufficient lighting is essential for the growth of microalgae, as they are classified under plants. The recommended lighting schedule is 12 hours of light and 12 hours of darkness. A cheap aquarium light would provide sufficient lighting without generating extra heat, which can cause fermentation in the plastic bottle cultivator.
Additional Note
These conditions were achieved through trial and error. One major mistake we encountered was using lighting that was too intense, leading to excessively high temperatures. We literally COOKED and FERMENTED our microalgae because of the excessive heat. Fermented within less than a day and came back to sweet-smelling microalgae.
Another significant mistake we made was using a starter culture that was actually dead. Initially, we assumed the mother microalgae, stored in the laboratory fridge and looking green, was alive all along. However, all our experiments using this culture failed. We also received advice from Blub Aquatics that storing microalgae in the fridge is not recommended. So, note to self: avoid storing microalgae in the fridge to maintain their viability and ensure successful cultivation.
Cultivating & Harvesting of Microalgae
In this section we will discuss the methods for cultivation & harvesting of microalgae. If you find our the next sections to be too scientific (or you have a low attention span, or impatient, or all of the above like me), just follow the pictures and the words highlighted in red.
Materials Required for Cultivation
The materials below is sufficient for the cultivation of approximately 3L of microalgae.
1. 3 × 1.5L plastic bottle
2. 1 × 30 - 40cm aquarium light
3. 150ml microalgae concentrate
4. 0.6g inorganic/ chemical fertilizer
5. 1 × 3 outlet air pump/ 3 × 1 outlet air pump/ 2 × 2 outlet air pump
6. 3 × pump tubing
7. 2.85L DI water
Method for Cultivation

Figure 1. Set-up for microalgae
1. Rinse the bottle with DI water.
2. Drill 2 hole on the bottle cap (1 for the air pump tube, 1 for the air to exit the bottle – this hole does not need to be too big).
3. Dilute 50ml of microalgae with 950ml of DI water.
4. Add 0.2g of chemical fertilizer.
5. Mix well.
6. Repeat step 1 to 5 for the other 2 bottles.
7. Set up the setup as shown in Figure 1., ensure the air pump tube reaches all the way down to the bottom of the plastic bottles.
8. If the microalgae suspension is observed to go up the tube, raise the height of the air pump to prevent air pump damage.
Harvesting for Storage and Continued Cultivation

Figure 2.1. Colour Intensity for harvesting
Once the colour intensity of the microalgae reaches a level similar to that shown in Figure 2.1., harvesting needs to be done. There is a need to harvest microalgae for storage to prevent the crashing of the culture, where microalgae begin to die and clump together due to the high concentration of microalgae. Microalgae can survive without aeration but require a 12-hour light and 12-hour of dark cycle. To store the microalgae for continued cultivation, there is a need to dilute the microalgae to reduce the concentration of microalgae per bottle.
Materials Required for Harvesting for Storage and Continued cultivation:
1. 3 × 1.5L plastic bottle
2. 1 × 30 - 40cm aquarium light
3. 3L microalgae concentrate
4. 0.6g inorganic/ chemical fertilizer
5. 1 × 3 outlet air pump/ 3 × 1 outlet air pump/ 2 × 2 outlet air pump
6. 3 × pump tubing
7. 2.85L DI water
Methods for Harvesting for Storage and Continued Cultivation
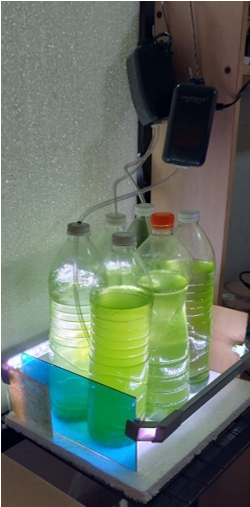
Figure 2.2. Set-up for storage and harvesting
1. Rinse the bottle with DI water.
2. Pour out 500ml of microalgae and dilute 500ml of DI water into a 1.5L bottle.
3. Dilute the other 500ml of microalgae with 500ml of DI water in the cultivation bottle.
4. Add 0.2g of chemical fertilizer.
5. Mix well.
6. Repeat step 1 to 5 for the other 2 bottles
7. Set up the set up as shown in figure 2.2., ensure the air pump tube reaches all the way down to the bottom of the plastic bottles.
8. If the microalgae suspension is observed to go up the tube, raise the height of the air pump to prevent air pump damage.
Conclusion
I hope this guide proves useful on your microalgae cultivation journey. Our hope is that you won't encounter too many challenges. If you have any questions, please visit the "Contact Us" section on our homepage, and we'll respond promptly. And remember, the most crucial aspect of microalgae cultivation: ENJOY THE PROCESS!
oh wow! thanks for the detailed list for methods and materials, i'll be sure to give this a try for my future phytoplankton culture. seems easier for me to replicate at home compared to the larger scale versions i do in school for aquaculture in TP (similar concept though!) 👍